Why Cookie Authentication Fails in Headless WordPress
Standard WordPress authentication relies on PHP sessions and cookies. However, modern frontend frameworks are often stateless. If your frontend is at myapp.com and your WordPress backend is at api.mysite.com, browser security policies (CORS) make cookie-sharing difficult and unreliable.
By implementing headless wordpress jwt authentication, you move to a “token-based” system. Your frontend exchanges credentials for a token, and then sends that token in the header of every subsequent request.
Setting Up JWT Authentication in WordPress
While you can write your own token logic, the industry standard is using the JWT Authentication for WP-REST API plugin. It provides a robust framework that works for both REST and can be extended for GraphQL.
Step 1: Configuration in wp-config.php
To secure your tokens, you must define a unique “Secret Key” in your wp-config.php file. This key is used to sign your tokens, making them impossible to forge.
define('JWT_AUTH_SECRET_KEY', 'your-top-secret-random-string-here');
define('JWT_AUTH_CORS_ENABLE', true);
Step 2: Enabling Server Headers
Most servers (especially Apache) strip out the “Authorization” header by default. You must explicitly tell your .htaccess file to allow it:
RewriteEngine on
RewriteCond %{HTTP:Authorization} ^(.*)
RewriteRule ^(.*) - [E=HTTP_AUTHORIZATION:%1]
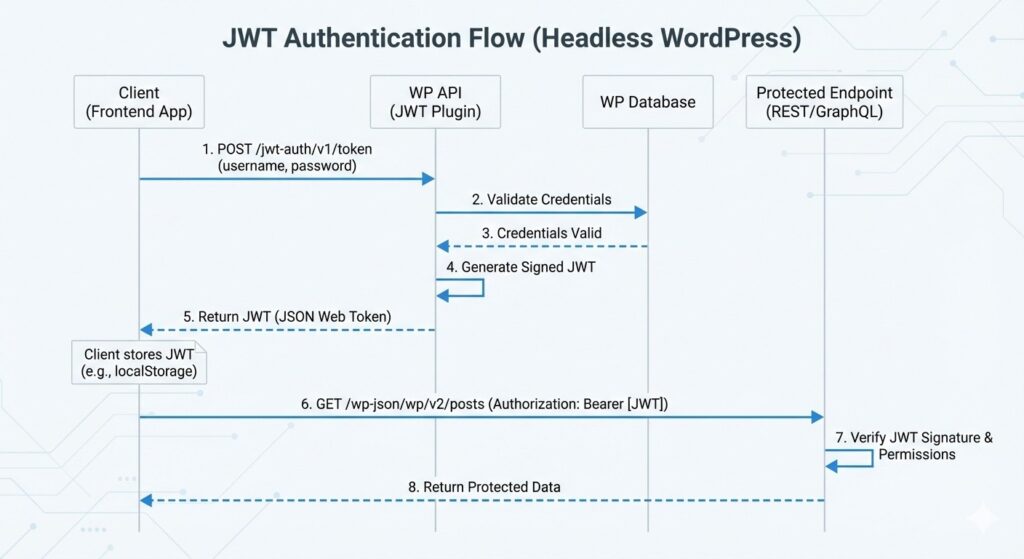
How the Authentication Flow Works
The process of authenticating a user in a headless environment follows a specific lifecycle:
- The Request: The frontend sends a POST request with a username and password to the
/jwt-auth/v1/tokenendpoint. - The Validation: WordPress verifies the credentials against its database.
- The Token: If valid, WordPress returns a signed JSON Web Token.
- The Storage: The frontend stores this token (usually in
localStorageor a secure cookie). - The Header: For all future requests (like fetching a private dashboard), the frontend adds the header:
Authorization: Bearer [your_token].
Security Foundations: Roles and Capabilities
A common mistake in headless development is assuming the token is the only security layer needed. The token only tells WordPress who the user is. You still need to ensure that the user has the right permissions to perform an action.
This is why understanding WordPress Roles and Capabilities is critical. Even with a valid JWT, your API should check if the user has the edit_posts capability before allowing a change. Never bypass these core security checks in your custom endpoints.
Best Practices for JWT Security
Implementing tokens is just the start; keeping them secure is the real challenge.
1. Use Short Expiration Times
By default, tokens can last for days. For high-security apps, reduce the expiration time to one hour. This limits the “window of opportunity” if a token is ever stolen.
2. Always Use HTTPS
Since JWTs are sent in the header, they are sent in plain text if you aren’t using an SSL certificate. Without HTTPS, a “man-in-the-middle” attack can easily intercept the token and hijack the session.
3. Use Refresh Tokens
Instead of forcing a user to log in every hour, implement “Refresh Tokens.” This allows the frontend to request a new access token without requiring the user’s password again.
Conclusion
Mastering headless wordpress jwt authentication is the gatekeeper to building truly interactive, decoupled applications. Whether you chose the REST API or WPGraphQL in the previous step, JWT provides the secure bridge needed to handle user-generated content and private data.
In the next post of this series, we will put this to use as we begin Building a High-Performance Frontend with Next.js.